Core Features
How to schedule a trip
Book a resident's ride — RideLogger checks for double-booked vehicles, driver availability, and capacity automatically. Any staff, driver, manager, or admin can schedule a trip.
Steps
- Click ➕ New Trip in the sidebar.
- In 👥 Residents on This Trip, search and choose the resident (or click + Add Resident to add more than one to the same trip). Once picked, you'll see their last 5 trips for quick context. Every row has a × to remove it — including the first one, so a placeholder booked before you knew who was going can simply be deleted once the real names arrive.
- If the resident has aides on file, they appear as chips under their name. Tap whoever is attending that day — see Aides and companions. Nothing is attached automatically.
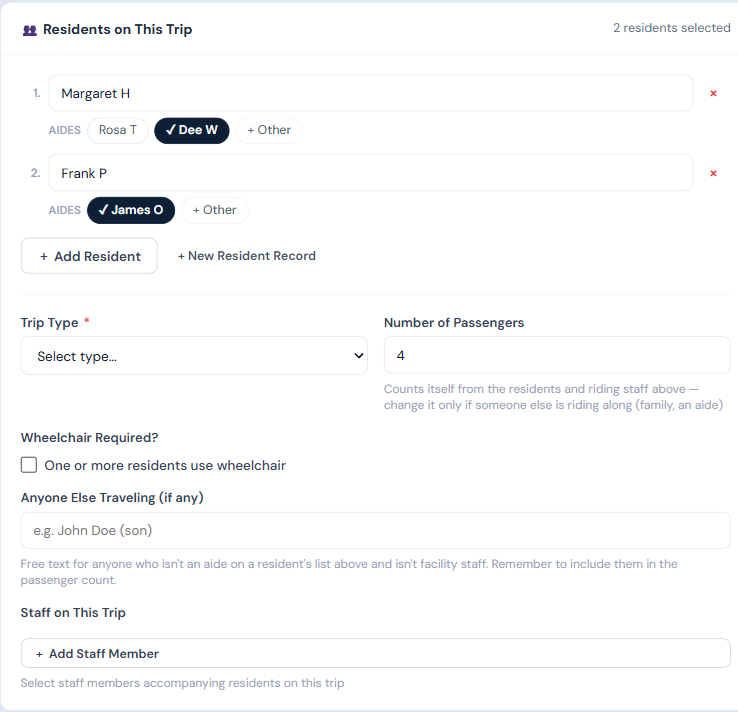
- Still in that section, choose a Trip Type * — 🏥 Doctor Appointment, 🛍️ Shopping, 📦 Errand, or 🎭 Group Outing.
- Check "One or more residents use wheelchair" if needed, note anyone else riding under Anyone Else Traveling, and click + Add Staff Member to add anyone accompanying the trip — drivers are labeled (Driver) (this includes staff flagged "also drives", not just the Driver role), outside aides are labeled (Aide), and front-desk/admin accounts are hidden here unless they're flagged as driving too.

- Number of Passengers counts itself from everything above — residents, attached aides, and any staff riding along who aren't driving. Change it only if someone else is coming who isn't on the form, such as a family member.
- In 📍 Destination & Timing, set the Appointment Date and Appointment / Arrival Time (the time the resident needs to be at the destination, not the pickup time).
- Pick the destination — search your saved directory (auto-fills name, address, and usually distance/drive time), or leave it blank and type a name and address for a one-off.
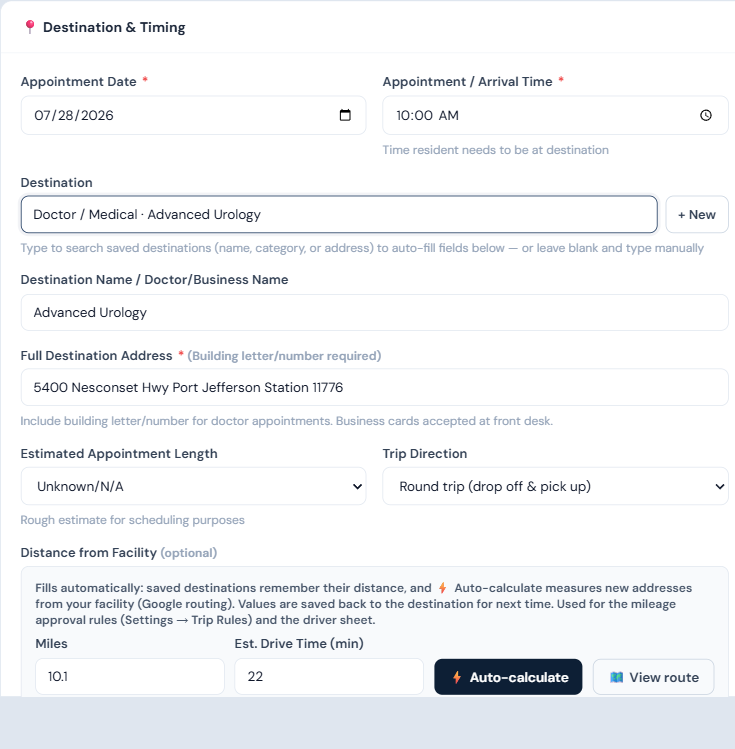
- Set Estimated Appointment Length (optional) and Trip Direction — Round trip (default), Drop off only, or Pick up only.
- In the Distance from Facility box (optional): a saved destination usually fills this in automatically; for a new address click ⚡ Auto-calculate to measure it from your facility's address (Settings → Facility Information), or 🗺️ View route to open it in Google Maps. Leave it blank if you don't need it — it's only used for the mileage rules in Settings → Trip Scheduling Rules and on the printed driver sheet.
- In 🚐 Vehicle Assignment, choose a vehicle — RideLogger checks its seat and wheelchair capacity against the trip and shows same-day capacity/driver availability above the field. The Contact Phone for This Trip is auto-filled from the resident; change it only if someone else (e.g. a family member) should get calls/texts for this specific trip.
- In 📝 Notes, add any special instructions and check "📌 Flag this note for the front desk" if this trip needs extra attention — it surfaces the note in the Dashboard's "Today's Messages" box on the day of the trip.
- Click 📋 Schedule Trip.
If you see a warning
- A conflict warning appears if the vehicle is already booked for an overlapping time, the chosen driver isn't scheduled to work that day, the vehicle is marked out-of-service, or the trip exceeds seat/wheelchair capacity. These are warnings, not hard blocks — you can still save.
- Weekend trips show a warning and are saved as Needs Approval rather than blocked outright.
- If the trip breaks a rule set in Settings → Trip Scheduling Rules (disallowed day for Doctor or Shopping/Errand trips, outside the transport window, or over the "needs approval" mileage threshold), it's saved as Needs Approval instead of Approved. A manager or admin can approve or decline it from the trip detail view. If Doctor/Shopping distance exceeds the separate hard mileage limit (if one is set), the trip is blocked from saving entirely instead — see Set your trip rules.
Who can do this
Any logged-in role (staff, driver, manager, admin) can schedule a trip.
Notes
- Trip-only staff (no login) can be added to Staff on This Trip but can't log in to create trips themselves.
- There's no live "Ready By" preview on the New Trip form itself — once the trip is saved, trip cards on the Dashboard and Schedule show a computed "Ready by [time]" (30 minutes before the appointment time), and it also appears on the driver sheet.
- The Distance from Facility fields are optional — skip them if speed matters more than mileage tracking for your facility.
- Auto-calculate sends only the destination address to Google's routing service — no resident information leaves the app for that call.