Core Features
How to add or edit a vehicle
Your fleet lives in ⚙️ Settings → 🚐 Fleet Management — vehicle name, seats, wheelchair spaces, and VIN. Seats and wheelchair spaces here are what RideLogger checks a trip against when it warns you about capacity.
Steps
- Go to ⚙️ Settings and find the 🚐 Fleet Management card.
- Click + Add Vehicle (or Edit on a vehicle you already have).
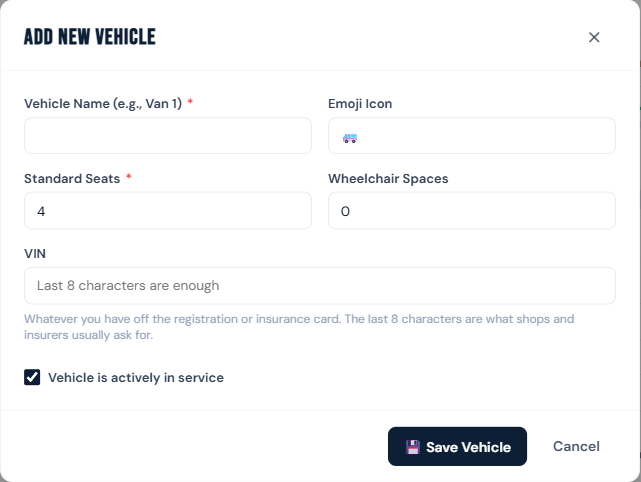
- Fill in:
- Vehicle Name — what your staff call it, e.g. Van 1 or Bus.
- Emoji Icon — shows next to the name on trips and the dashboard.
- Standard Seats — ordinary passenger seats, not counting the driver's seat.
- Wheelchair Spaces — how many wheelchairs it can carry. Anything above zero marks the vehicle as wheelchair-capable, so it can be picked for wheelchair trips.
- VIN — optional; see below.
- Leave "Vehicle is actively in service" ticked, and click 💾 Save Vehicle.
Recording a VIN
The VIN field takes whatever you have off the registration or insurance card. You don't need the full 17 characters — the last 8 are what repair shops and insurers usually ask for, so entering just those is fine.
Spaces and dashes don't matter; RideLogger stores it in a consistent form either way. The Fleet Management table shows the last 8 characters to keep the row readable — hover over it to see the whole thing.
Who can do this
Managers and admins (Settings isn't shown to staff or drivers).
Notes
- Total capacity is standard seats plus wheelchair spaces. That's the number the dashboard's 🚐 Vehicle Capacity Today bars fill against, and what a trip's passenger count is checked against.
- Don't count the driver's seat in Standard Seats — RideLogger already treats an assigned driver as taking the driver's seat rather than a passenger seat.
- To take a vehicle off the road permanently, untick "Vehicle is actively in service" rather than deleting it — retired vehicles stop appearing in the trip vehicle picker but stay attached to the trip history that used them.
- For a vehicle that's off the road temporarily (servicing, repair), use the out-of-service and block tools on the Schedule view instead, so trips on those dates get a conflict warning.